Tuesday, February 28, 2012

Pimp my Machine..sort of


Yesterday I went to the hardware store yesterday to buy some bungee cords to try out the above idea (the ghetto looking stuffed animal holder on the wardrobe door). The girls love it but I'm still waiting for a better idea to hit me. If anyone has an idea for harnessing stuffed animals (but not somewhere on the floor) I'm all ears.  Anyway, I pass the wheel aisle and remember that I have been wanting to make a sewing machine tilt table on wheels (for lack of a better name) for ever. Exciting! I spent way to much time there (poor Ava) comparing wheels and finding a board, having it cut by the German employee that looked at me like I was a retarded leper that smelled bad when I asked if he could round the edges. Whatev.


So as you can see from the pictures, this is a (very slightly) tilting table that your sewing machine sits on. It makes it so your machine is angled towards you while you sew. You can conceivably see what your sewing better. I wanted it on wheels because I am always pushing my machine out of the way and it has rubber feet on the bottom and weighs a ton. Pain in the butt. Or as my German friend would say, "Du regst mich auf" which actually translates to "You excite me". I think she's messing with me.

Supplies:
1 piece of wood the size of your machine. Mine is 15.75"x7.875" and 3/4" thick.
4 wheels (2 that are taller than that other 2) . The size is up to you.
screws or nails for the wheels
Drill or hammer; depends on how you attach the wheels.

This cost me about $10.
I would have painted it and made it all pretty but I'm not sure what I want to do.
Instructions:
All I did was pick a side for the wheels, somewhat center the wheels in each corner and attach the wheels with screws (refer to pictures). And it's done! Until I think of how pretty I want to make it:)
 Does it roll away from me when I sew? A little. Nothing that has bothered me so far and I sewed today just so I could report whether it does move. I knew that might be a problem but If I wanted locking wheels they would have been HUGE and my machine would have been elevated 3" or more. I'm just so happy to be able to push my machine out of the way so easily!

Emily & Ava at the playground.


Wednesday, February 22, 2012

Woodland Wreath (paper)

I have spent entirely too  many hours at my desk watching my Silhouette Cameo cut out all these woodland critters and then gluing them together. Too many! But I think it's so cute so therefore worth it.  My machine cut ALL of this out. Every single animal, bird and flower etc. that you see above is available to be downloaded for .99 cents each (50cents if on sale). That is one reason I love this machine. With other cutting machines you have to buy cartridges that have several designs on them and you may not want all of them and they are expensive. When I bought this machine it came with a gift certificate so you can download stuff and start right away.
See the Gnome? He's 6 different colors. That means I have to run paper through the machine in 6 different colors. But I've learned how to do several colors in one run through. Kind of hard to explain but it is easy to use. I was REALLY worried I wouldn't be smart enough to figure this machine out after reading some reviews but right out of the box and with some 12x12 sparkly card stock from Joann's I made a Merry Christmas banner within probably 30 minutes. It was mostly just getting used to the program and figuring out buttons, etc. I also got the Designer program (for 40% off thank you very much!) when I bought the machine so I can make my own designs instead of buying them from the Silhouette online store.
The hedgehog is my favorite. He is 3 layers of card stock.
There's a fox, frog, deer, snail, skunk, owl(s), bird(s), raccoon, squirrel, acorn and I love the tree stump at the top next to the raccoon. It's all glued to a thick cardboard circle.
And here it is on my door. I also made the paper welcome banner on the Silhouette. Jon asked when the party was. It does look party-ish...but he's not invited because he thinks he's funny.

Last week was one of Emily's friends Birthdays. Since her birthday always falls during Fasching week she asks that you come to her party dressed up ( I don't know if I posted last years party). I got both these costumes at a German store. Ava's is a "Bavarian German Beer Girl Fancy Dress Costume" and Emily's is an "ill-fitting fairy costume":). I hate that they both had to wear shirts under the dresses but it has been anywhere from 11-25 degrees here.

Wednesday, February 15, 2012

t.v. tray


T.V. tray ironing board from here.
Nice and foldable and put away-able. I did a very very bad job of stapling the fabric to the underside! I hate my staple gun or maybe I just need a proper lesson on how to use it:) I have had this project in on my to-do list for ages! A week or so ago I was at Aldi, a German grocery store, and saw some ironing board insulation sold in packages. Just packages of batting made especially for ironing boards. It was a sign! The fabric is a decorator weight fabric from Ikea. The table is the perfect size for small projects.


Our 1st real snow (snow that sticks, can be thrown and piled)! This was yesterday on the way in from the bus stop. If you don't have a snowball maker and you live in a place where it snows, then you have to get one! They are $5.00 on Amazon. They make perfect snowballs and you can make like 20 in 30 seconds (or so). I got the snowman kit  (hat, carrot, nose and eyes) from Target right after Christmas for something like 90% off so it was 10cents or something ridiculous like that.


Thursday, February 9, 2012

The quilt that doesn't match anything


Another project I kind of had finished before I left for the States. I finished the top in maybe October, sent it off to be quilted and waited for it to arrive while in San Diego so I could put the binding on while there. It's for my sister-in-law Jessica. I have a feeling she is regretting telling me to choose the fabric (she chose the pattern which I wouldn't have chosen but only because I had never done triangles before)! It's just not as cute as I had envisioned and doesn't really match her yellow walls and pepto pink curtains.
The fabric is Sherbet Pips and the quilt pattern is Little Ones from Thimble Blossoms.


I had bought a grey for the border (a Kona cotton) here at my old work and a different one while in the states and hated both of them when it came time to sew the border on. So I bothered some people on flickr asking if anyone knew of a gray that went perfectly with this line. Someone was actually kind enough to help and told me about a line of solids sold in the UK. I ordered their swatch card and when it came they gray matched perfectly so I ordered some yardage. it's from backstitch.co.uk and the fabric is 54" wide Klona Cotton (not to be confused with Kona Cotton!).

And backed in my favorite print from the line.
And here it is on her king-size bed.

Sunday, February 5, 2012

Penguin Pack-Packs

This is another of the things I made before we flew back in December. This is the girls at the Frankfurt airport wearing their Oliver + S Little Things to Sew back packs. It's actually two patterns. The one I just mentioned for the penguin part but the size and actual pattern is the Made by Rae toddler back pack the larger version (it's larger than the original one she put out by about 2" all around making it able to fit regular size folders). She sells this add on to the pattern on her blog.
I made the zipper ...two headed? Double ended? What do you call that? I can't think of the word for it right now. It has two zipper pulls and I like it.
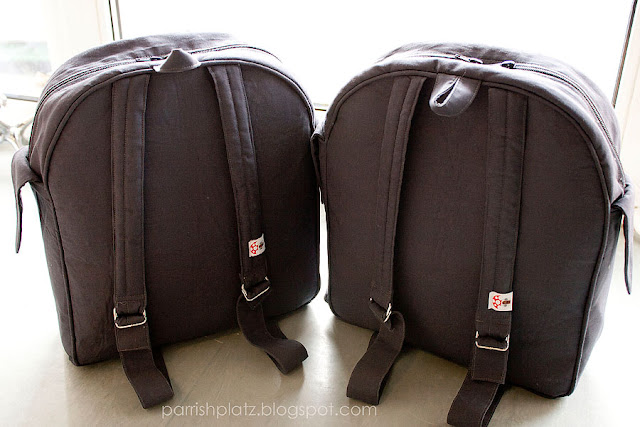
These were taken with nothing in them so you can see how the peltex holds the shape.
I did the front pockets two different ways. Ava's has piping all around hers and I just can't decide if I like it..in fact I started to unpick it as you can see in the photo then decided I just didn't have time as I started both back packs a week before we were to leave.  

When looking through the Oliver & S flickr pool for inspiration, I noticed that all the back packs had one thing in common: they all dropped and had no structure. So I added Peltex in the front, back,sides and bottom but not the zipper part. I also added piping around the whole thing but that had nothing to do with structure. Well actually it did. I thought it might make the front not look all puckery and caved in when stuff was in the back pack. In the 1st photo Emily has hers stuffed with thick heavy coloring books and other stuff so it does cave in at the top...really I have no idea if the peltex helped; I just liked the sturdiness of it in the end.

They really loved the back packs which makes me happy. I have a feeling though that if I rolled some dirty fabric around an empty toilet paper roll they would ew and ah. Simple kids. They get that from Jon's side of the family.


Related Posts Plugin for WordPress, Blogger...